My husband said, “This is the best banana bread you’ve ever made,” and then he took the last slice to work the next morning without telling me. I stood there staring at the empty loaf pan, half annoyed and half weirdly proud. I mean, I’d been chasing the perfect banana walnut bread for years—too dry, too dense, too sweet, not sweet enough. But this one? This one was different.
It happened on a Tuesday afternoon when I had three overripe bananas sitting on the counter looking sad and spotty. You know the ones—they’re practically begging to be baked. I was in a hurry (when am I not?), so I grabbed one bowl, dumped everything in, and crossed my fingers. No separate mixing of wet and dry ingredients. No sifting. No nonsense. Just a fork, a bowl, and a whole lot of hope.
The smell that filled my kitchen was ridiculous. Like, close-your-eyes-and-stand-there-for-a-second ridiculous. And when I finally cut into that warm loaf, the texture was exactly what I’d been chasing all these years—tender, moist, with those little pockets of crunchy walnut in every bite. It wasn’t fancy. It wasn’t complicated. It was just honest, good banana bread that actually worked.
Honestly? I think that’s why it stuck. Sometimes the best recipes aren’t the ones you slave over for hours. They’re the ones you throw together in one bowl when you’re not trying too hard. And that’s exactly what this one-bowl banana walnut bread is—proof that simple can be spectacular.
Why You’ll Love This Recipe
Let me tell you why this banana walnut bread has become my most-requested bake. It’s not because I’m some kind of pastry wizard—trust me, I’ve had my share of baking disasters. It’s because this recipe actually delivers on every single promise it makes.
- One Bowl, No Fuss : You read that right. Everything goes into a single mixing bowl. No stand mixer required, no separate bowls for dry ingredients, no complicated steps. Just one bowl and a fork. Perfect for those days when you want fresh banana bread but don’t want to wash a mountain of dishes.
- Perfectly Moist Every Time : I’ve tested this recipe more times than I care to admit. The secret is using really ripe bananas and the right ratio of oil to butter. The result is a loaf that stays moist for days—if it lasts that long, which it probably won’t.
- Simple Pantry Ingredients : You probably have everything you need right now. Flour, sugar, eggs, butter, oil, baking soda, salt, bananas, and walnuts. No weird specialty ingredients or expensive extracts. Just real food that makes real sense.
- Beginners Welcome : If you’ve never baked banana bread before, this is the recipe to start with. It’s forgiving, straightforward, and nearly impossible to mess up. I promise.
- Freezes Beautifully : Make two loaves and freeze one for later. It thaws perfectly and tastes just as fresh as the day you baked it. I always keep one in the freezer for unexpected guests or lazy Sunday mornings.
This isn’t just another banana bread recipe. It’s the one that finally made me stop looking. The texture is tender, the walnut crunch is satisfying, and the flavor is exactly what banana bread should be—sweet but not cloying, rich but not heavy. It’s the kind of bread that makes you close your eyes after the first bite. And honestly? That’s the highest compliment I can give any recipe.
What Ingredients You Will Need
This recipe uses simple, humble ingredients that come together to create something truly special. Here’s what you’ll need and why each one matters.
- 3 large ripe bananas, mashed (about 1 ½ cups) : The riper, the better. Look for bananas with lots of brown spots—they’re sweeter and easier to mash. If your bananas aren’t ripe enough, you can bake them at 300°F for 15 minutes to speed things up. I’ve done this plenty of times when I couldn’t wait.
- ½ cup unsalted butter, melted and slightly cooled : Butter adds richness and flavor that oil alone can’t match. I use unsalted so I can control the salt level. If you only have salted butter, just reduce the added salt to ¼ teaspoon.
- ¼ cup vegetable oil : The oil is what keeps this bread incredibly moist. It’s the secret weapon. You can use canola, avocado, or any neutral-flavored oil. Don’t skip it—the combination of butter and oil is what makes the texture so perfect.
- ¾ cup granulated sugar : Regular white sugar works beautifully. It dissolves easily and gives the bread a nice, tender crumb. If you prefer a less sweet bread, you can reduce it to ½ cup, but I think ¾ cup hits the sweet spot.
- 2 large eggs, room temperature : Room temperature eggs incorporate more easily and create a better texture. If you forgot to take them out of the fridge, place them in a bowl of warm water for 5 minutes. Problem solved.
- 1 teaspoon vanilla extract : Pure vanilla extract makes a difference. Skip the imitation stuff if you can. It adds warmth and depth that complements the banana flavor perfectly.
- 1 ½ cups all-purpose flour : Standard all-purpose flour works great. For a whole wheat version, substitute up to half the flour with whole wheat pastry flour. I’ve tested it and it still comes out tender.
- 1 teaspoon baking soda : This is the only leavening agent you need. Make sure it’s fresh—old baking soda won’t give you the rise you want. If you’re unsure, test it by dropping a little into vinegar. It should fizz immediately.
- ½ teaspoon salt : Salt enhances all the flavors and balances the sweetness. Don’t skip it. I use fine sea salt, but regular table salt works too.
- 1 cup walnut halves or pieces, roughly chopped : Walnuts add that wonderful crunch and earthy flavor that pairs so beautifully with banana. Toast them lightly in a dry pan for 2-3 minutes before adding to the batter—it brings out their nuttiness. I recommend using fresh walnuts from a reliable source for the best flavor.
Optional additions : A handful of chocolate chips makes this bread irresistible. Cinnamon (1 teaspoon) adds warmth. A tablespoon of dark rum or bourbon gives it a grown-up twist. I’ve tried all of these and they’re all wonderful in their own way.
Equipment Needed
You don’t need a fancy kitchen to make this banana walnut bread. Here’s what you’ll actually use:
- One large mixing bowl : Any medium-to-large bowl will do. I use a ceramic one, but glass or metal works just as well.
- A fork or whisk : A fork works perfectly for mashing bananas and mixing the batter. A whisk is nice but not necessary.
- 9×5-inch loaf pan : This is the standard size. If you use an 8×4-inch pan, your bread will be taller and可能需要 slightly longer baking time. If you use a 10-inch pan, it will be shorter and bake faster.
- Parchment paper : This is optional but highly recommended. It makes lifting the bread out of the pan so much easier. I always line my pan with a parchment sling.
- Cooling rack : A wire rack allows air to circulate around the bread so it cools evenly. If you don’t have one, you can use the stovetop grates or just let it cool in the pan for 10 minutes before turning out.
- Measuring cups and spoons : Accurate measurements matter in baking. Use dry measuring cups for flour and sugar, and liquid measuring cups for oil and vanilla.
- Rubber spatula : For scraping every last bit of batter into the pan. I’m particular about this—waste not, want not.
That’s it. No stand mixer, no food processor, no special gadgets. Just the basics. If you have these things, you’re ready to bake.
Preparation Method
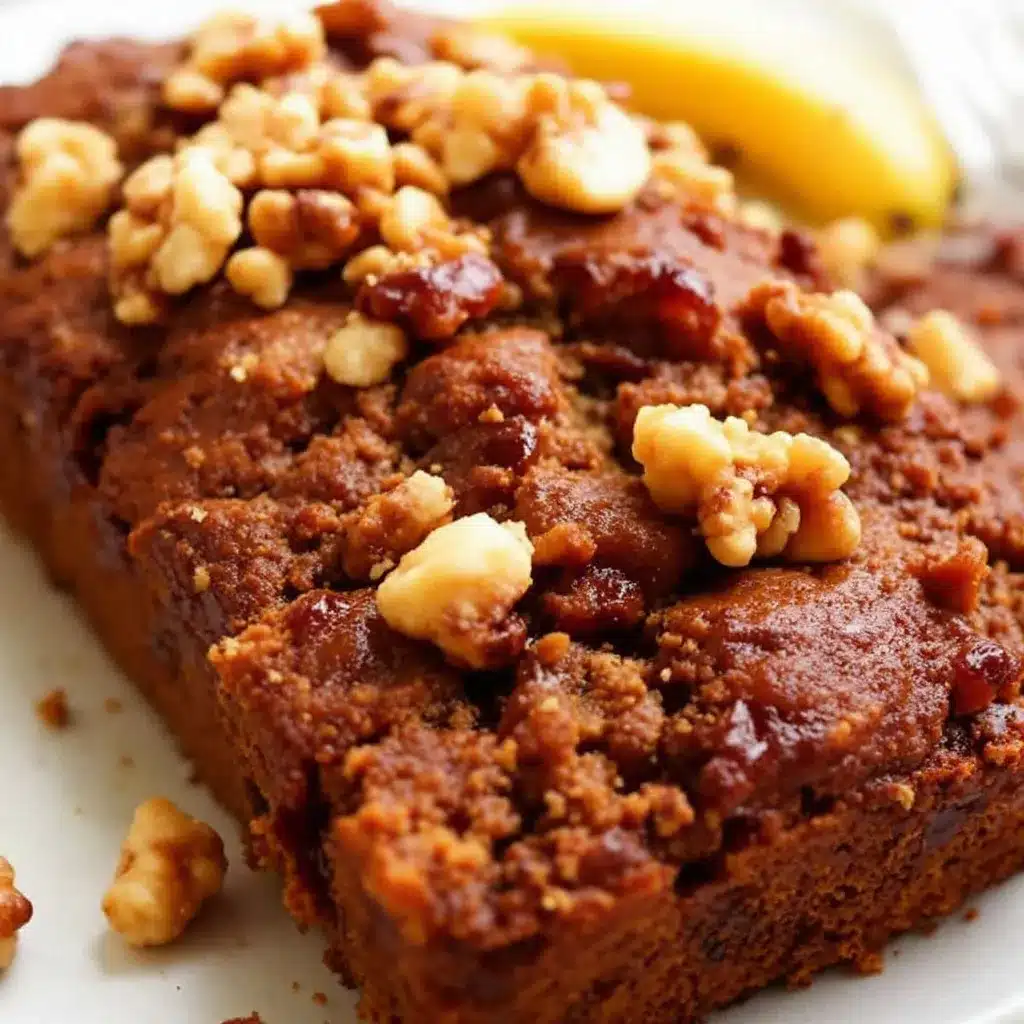
Let’s get to the good part. Follow these steps and you’ll have the most incredible banana walnut bread coming out of your oven in about an hour.
Step 1: Preheat and prepare your pan.
Preheat your oven to 350°F (175°C). Grease your 9×5-inch loaf pan with butter or cooking spray, then line it with a strip of parchment paper that hangs over the two long sides. This creates a sling that makes lifting the bread out effortless. Trust me on this one.
Step 2: Mash the bananas.
Peel the bananas and place them in your large mixing bowl. Mash them with a fork until they’re mostly smooth with a few small lumps remaining. You want some texture, not baby food. It should look like lumpy porridge. Measure out 1 ½ cups of mashed banana—if you have extra, save it for smoothies. If you’re short, mash another half banana.
Step 3: Add the wet ingredients.
To the mashed bananas, add the melted butter, vegetable oil, granulated sugar, eggs, and vanilla extract. Stir everything together with your fork or whisk until it’s well combined. The mixture will look a little grainy from the sugar, and that’s perfectly fine. Don’t overmix—just stir until you don’t see any streaks of egg or pools of butter.
Step 4: Add the dry ingredients.
Sprinkle the flour, baking soda, and salt over the wet mixture. Stir gently with your fork or a rubber spatula until just combined. A few streaks of flour are okay—you don’t want to overmix because that develops gluten and makes the bread tough. Stop when you can’t see any more dry flour. This should take about 15-20 strokes.
Step 5: Fold in the walnuts.
Add the chopped walnuts to the batter and fold them in gently with your spatula. Make sure they’re evenly distributed throughout the batter. If you’re adding chocolate chips or cinnamon, fold them in now too. The batter will be thick and slightly lumpy—that’s exactly what you want.
Step 6: Transfer to the pan.
Scrape the batter into your prepared loaf pan and spread it into an even layer. Tap the pan gently on the counter a few times to release any air bubbles. If you want a prettier top, you can sprinkle a few extra walnut halves on top before baking.
Step 7: Bake.
Place the pan in the preheated oven and bake for 50-60 minutes. Start checking at 50 minutes by inserting a toothpick into the center of the bread. If it comes out clean or with a few moist crumbs (not wet batter), it’s done. The top should be golden brown and cracked in that beautiful, rustic way banana bread does.
Step 8: Cool properly.
Let the bread cool in the pan for 10-15 minutes. Then, use the parchment sling to lift it out and transfer it to a wire rack. Let it cool completely before slicing—I know it’s hard to wait, but slicing warm banana bread can make it crumble. If you absolutely can’t resist, use a serrated knife and gentle sawing motions.
Cooking Tips & Techniques
After making this banana walnut bread more times than I can count, I’ve learned a few things the hard way. Here are my best tips to set you up for success.
Don’t overmix the batter. This is the number one mistake I see home bakers make. Overmixing develops gluten, which makes your bread tough and dense instead of tender and fluffy. Stir just until the flour disappears. A few lumps are your friend.
Use really, really ripe bananas. I cannot stress this enough. Green or yellow bananas won’t give you the sweetness or moisture you need. Wait until they’re covered in brown spots and practically falling apart. If your bananas aren’t ripe enough, you can roast them in their skins at 350°F for 15 minutes. I’ve done this in a pinch and it works surprisingly well.
Toast your walnuts first. This is a game-changer. Spread the walnuts on a baking sheet and toast them at 350°F for 5-7 minutes until they smell fragrant. Let them cool before adding to the batter. Toasting brings out their natural oils and makes them crunchier. It takes five minutes and makes a world of difference.
Check for doneness properly. Every oven runs differently. Your bread might be done at 50 minutes or might need 65. The toothpick test is your best friend, but also look for these signs: the top should be deep golden brown, the edges should pull away slightly from the pan, and the bread should feel firm when you gently press the center.
Let it cool completely. I know, I know. The smell is intoxicating and you want to dig in immediately. But slicing warm banana bread is a recipe for crumbs and frustration. The bread continues to set as it cools, and the texture improves significantly. Give it at least an hour on the cooling rack. Use that time to make a cup of coffee and savor the anticipation.
Measure your flour correctly. Scooping flour directly from the bag packs it down and can add up to 25% more flour than you need. Instead, fluff the flour with a spoon, spoon it into your measuring cup, and level it off with a knife. This simple technique ensures consistent results every time.
Variations & Adaptations
This banana walnut bread is wonderfully adaptable. Here are some of my favorite variations that I’ve tested and loved.
Chocolate Chip Banana Walnut Bread : Fold in ½ cup of semi-sweet chocolate chips along with the walnuts. The combination of chocolate and banana is classic for a reason. I’ve made this for birthday breakfasts and it’s always a hit.
Gluten-Free Version : Substitute the all-purpose flour with a good quality gluten-free flour blend that contains xanthan gum. I’ve used Bob’s Red Mill 1-to-1 Baking Flour with excellent results. The texture is slightly more delicate, but it’s still incredibly moist and delicious.
Vegan Banana Walnut Bread : Replace the eggs with two flax eggs (2 tablespoons ground flaxseed mixed with 6 tablespoons water, let sit for 5 minutes). Use melted coconut oil or vegan butter instead of regular butter. The bread comes out a bit denser but still wonderfully moist.
Spiced Version : Add 1 teaspoon of cinnamon, ½ teaspoon of nutmeg, and ¼ teaspoon of ground ginger to the dry ingredients. This gives the bread a warm, cozy flavor that’s perfect for fall. I love this version with a drizzle of honey on top.
Nut-Free Option : Simply omit the walnuts or substitute them with sunflower seeds, pumpkin seeds, or dried fruit like raisins or chopped dates. The bread will still be moist and delicious—just without the crunch.
Mini Loaves or Muffins : Divide the batter among 3 mini loaf pans or a 12-cup muffin tin. Mini loaves bake for 30-35 minutes, and muffins bake for 18-22 minutes. Great for gifting or portion control.
I once made a batch of these as muffins for a brunch party, and they disappeared before the main course even came out. People were walking around with muffin crumbs on their shirts, not even caring. That’s when you know you’ve got a winner.
Serving & Storage Suggestions
This banana walnut bread is wonderful on its own, but here are some ways to make it even more special.
Serving temperature : Serve at room temperature or slightly warm. If you want to warm it up, pop a slice in the toaster or microwave for 10-15 seconds. It brings out the flavors and makes the butter in the bread soften slightly.
Perfect pairings : A slice of this bread with a pat of salted butter is pure heaven. For a more indulgent treat, spread it with cream cheese or mascarpone. It’s also fantastic alongside a cup of coffee, a chai latte, or a glass of cold milk. For a fun twist, try serving it with a side of refreshing mango jalapeño agua fresca for a sweet-spicy contrast that’s surprisingly delightful.
Storage : Store the bread in an airtight container at room temperature for up to 4 days. Wrap it tightly in plastic wrap or aluminum foil to prevent it from drying out. I like to keep it in a bread box with a paper towel to absorb excess moisture.
Freezing instructions : This bread freezes beautifully. Wrap the completely cooled loaf (or individual slices) tightly in plastic wrap, then in aluminum foil, and place in a freezer bag. It will keep for up to 3 months. To thaw, leave it at room temperature for a few hours or microwave individual slices for 20-30 seconds.
Flavor development : Here’s something interesting—this bread actually tastes better the day after it’s baked. The flavors meld together and the texture becomes even more moist. So if you can resist eating it all on day one, you’re in for a treat on day two.
Nutritional Information & Benefits
While this banana walnut bread is definitely a treat, it does have some redeeming nutritional qualities worth mentioning.
Estimated nutrition per slice (1/12 of loaf) :
Calories: 285 | Fat: 16g | Carbohydrates: 32g | Fiber: 2g | Sugar: 16g | Protein: 5g
Health highlights : Bananas are packed with potassium, vitamin B6, and vitamin C. They also contain resistant starch, which is good for gut health. Walnuts are an excellent source of omega-3 fatty acids, which support heart and brain health. The combination of butter and oil provides healthy fats that help keep you full and satisfied.
Dietary considerations : This recipe contains gluten, dairy, eggs, and tree nuts (walnuts). For gluten-free, vegan, or nut-free options, check the variations section above. The recipe can be made lower sugar by reducing the sugar to ½ cup or using coconut sugar.
My personal take : I don’t believe in labeling food as “guilt-free” or “naughty.” This is real food made with real ingredients, and it’s meant to be enjoyed. One slice of homemade banana bread is not going to derail your health goals. What matters is the overall pattern of your eating, not one single treat. So go ahead, have that second slice. You deserve it.
Conclusion
This one-bowl banana walnut bread has become a staple in my kitchen for a reason. It’s simple enough for a Tuesday afternoon but special enough for a holiday brunch. It uses ingredients you probably already have, comes together in minutes, and delivers that perfect combination of moist crumb and crunchy walnut in every single bite.
What I love most about this recipe is how forgiving it is. You can use slightly different amounts of banana, swap in different nuts, or add chocolate chips—and it still works. It’s the kind of recipe that builds confidence in the kitchen, especially if you’re new to baking. And honestly? That’s a beautiful thing.
I’d love to hear how yours turns out. Did you add chocolate chips? Try the gluten-free version? Did your family fight over the last slice like mine does? Drop a comment below and let me know. And if you’re looking for another quick and satisfying dish, you might enjoy this easy Thai coconut curry pulled pork for a completely different but equally rewarding cooking experience.
Happy baking, friends. May your bananas always be spotty and your bread always be moist.
Frequently Asked Questions
Can I use frozen bananas for this recipe?
Absolutely! Frozen bananas work great. Thaw them completely at room temperature, then drain off any excess liquid before mashing. The texture might be slightly softer, but the flavor is even more concentrated.
Why did my banana bread sink in the middle?
This usually happens for one of two reasons: either the bread was underbaked, or you opened the oven door too early. Resist the urge to peek until at least 45 minutes of baking time have passed. A sudden temperature drop can cause the bread to collapse.
Can I reduce the sugar in this recipe?
Yes, you can reduce the sugar to ½ cup without major issues. The bread will be less sweet and the texture might be slightly denser, but it will still be delicious. I’ve tested it with ½ cup and it works beautifully.
How do I know when my bananas are ripe enough?
Look for bananas that are heavily spotted with brown or even mostly black on the outside. They should be soft to the touch and smell sweet. If you can mash them easily with a fork, they’re ready. Don’t use green or yellow bananas—they won’t give you the sweetness or moisture you need.
Can I make this bread without walnuts?
Of course! Simply omit the walnuts or substitute them with pecans, chocolate chips, dried fruit, or seeds. The bread will still be moist and delicious. You can also add a streusel topping if you want extra texture without the nuts.
Easy One-Bowl Banana Walnut Bread Recipe
This one-bowl banana walnut bread is tender, moist, and packed with crunchy walnuts. It’s the perfect simple recipe for using up overripe bananas and delivers incredible flavor with minimal effort.
- Prep Time: 15 minutes
- Cook Time: 55 minutes
- Total Time: 1 hour 10 minutes
- Yield: 12 servings 1x
- Category: Dessert
- Cuisine: American
Ingredients
- 3 large ripe bananas, mashed (about 1 ½ cups)
- ½ cup unsalted butter, melted and slightly cooled
- ¼ cup vegetable oil
- ¾ cup granulated sugar
- 2 large eggs, room temperature
- 1 teaspoon vanilla extract
- 1 ½ cups all-purpose flour
- 1 teaspoon baking soda
- ½ teaspoon salt
- 1 cup walnut halves or pieces, roughly chopped
Instructions
- Preheat your oven to 350°F (175°C). Grease a 9×5-inch loaf pan with butter or cooking spray, then line it with a strip of parchment paper that hangs over the two long sides.
- Peel the bananas and place them in a large mixing bowl. Mash them with a fork until mostly smooth with a few small lumps remaining. Measure out 1 ½ cups of mashed banana.
- To the mashed bananas, add the melted butter, vegetable oil, granulated sugar, eggs, and vanilla extract. Stir together with a fork or whisk until well combined.
- Sprinkle the flour, baking soda, and salt over the wet mixture. Stir gently with a fork or rubber spatula until just combined. A few streaks of flour are okay.
- Add the chopped walnuts to the batter and fold them in gently until evenly distributed.
- Scrape the batter into the prepared loaf pan and spread it into an even layer. Tap the pan gently on the counter a few times to release any air bubbles.
- Bake for 50-60 minutes. Start checking at 50 minutes by inserting a toothpick into the center of the bread. If it comes out clean or with a few moist crumbs, it’s done.
- Let the bread cool in the pan for 10-15 minutes. Then, use the parchment sling to lift it out and transfer it to a wire rack. Let it cool completely before slicing.
Notes
Use really ripe bananas for best sweetness and moisture. Toast walnuts before adding for extra crunch. Don’t overmix the batter to keep the bread tender. Let the bread cool completely before slicing to prevent crumbling.
Nutrition
- Serving Size: 1 slice (1/12 of loa
- Calories: 285
- Sugar: 16
- Sodium: 220
- Fat: 16
- Saturated Fat: 6
- Carbohydrates: 32
- Fiber: 2
- Protein: 5
Keywords: banana bread, walnut bread, one-bowl banana bread, easy banana bread, moist banana bread, banana walnut bread


