I need something scary good and zero stress right now. The house is quiet, the kids are finally asleep, and I am staring at a kitchen counter that looks suspiciously like a crime scene of snack preparations. It is October 28th. Panic is setting in. I want a centerpiece that looks like it took hours of macabre artistry but actually requires less effort than making a sandwich. Let’s face it, I do not have time to carve pumpkins or bake intricate cookies that will get ruined if the humidity changes by one percent. I need a Spooky Graveyard Halloween Charcuterie Board that screams “I planned this for weeks” while whispering “I bought most of this at the grocery store.”
Honestly, I have spent too many Halloweens trying to be the perfect hostess with elaborate themes that ended up with me sweating in the kitchen while guests stood around eating cold crackers. This year, I am choosing the path of least resistance with maximum visual impact. I want the graveyard vibe without the graveyard shift. You know how it goes—you want the aesthetic of a haunted mansion but the functionality of a grab-and-go snack station.
The idea hit me while I was rearranging the cheese section at the store. I noticed how the pale blocks of cheese looked like tombstones if you just stood them up. It was that simple. No cooking required. Just assembly. I realized that if I leaned into the “dirt” and “bones” concept, I could create something that feels deeply thematic and fun for kids, yet sophisticated enough for the adults who just want good cheese and crackers. This is the kind of recipe that saves your sanity. It is the kind of spread that gets compliments without requiring you to sacrifice your evening. I am ready to build my little cemetery of snacks.
Why You’ll Love This Spooky Graveyard Halloween Charcuterie Board
This recipe is not just about putting food on a plate; it is about creating a moment. I have tested this layout with every type of crowd I can think of, from picky toddlers to skeptical foodie friends, and it consistently wins. Here is why this Spooky Graveyard Halloween Charcuterie Board deserves a spot in your Halloween rotation:
- Quick & Easy: This comes together in under 20 minutes. You do not need to turn on the oven or chop a single vegetable. It is perfect for busy weeknights or last-minute Halloween parties where you forgot to prepare anything until 4 PM.
- Simple Ingredients: No fancy grocery trips needed. You likely already have most of this in your pantry and fridge. It relies on staples like cheese, crackers, and snacks, transformed by arrangement rather than complex cooking techniques.
- Perfect for Halloween Parties: Great for trick-or-treat drop-offs, classroom parties, or cozy dinners. The theme fits the season perfectly without being overly childish.
- Crowd-Pleaser: Always gets rave reviews from kids and adults alike. Kids love the “bones” and “dirt,” while adults appreciate the quality of the cheeses and meats. It bridges the gap between fun and flavor.
- Unbelievably Delicious: The texture and flavor combo is next-level comfort food. The crunch of the crackers, the creaminess of the cheese, and the saltiness of the meat create a satisfying bite every time.
What makes this recipe different from the rest is the visual trickery. Most charcuterie boards are just pretty piles of food. This one tells a story. By using simple shapes and colors, we create a scene. Whether it is the clever use of pretzel sticks as tombstones or the “dirt” made from crushed cookies, it is a creative twist that elevates a standard snack plate. This isn’t just another version of a cheese board—it is your best version because it requires zero cooking skills but delivers maximum wow factor.
It is the kind of board that makes you close your eyes after the first bite and smile. It is comfort food reimagined—festive, fast, but with the same soul-soothing satisfaction as a home-cooked meal. It is perfect for impressing guests without stress, or turning a simple afternoon snack into something memorable. You get the credit for being creative without the work of being a chef.
What Ingredients You Will Need
This recipe uses simple, wholesome ingredients to deliver bold flavor and satisfying texture without the fuss. The beauty of a graveyard theme is that you can use everyday items and just change their presentation. You do not need exotic spices or hard-to-find meats. The goal is to use pantry staples and seasonal favorites to create a cohesive look. Here is what you will need to build your own edible cemetery.
- For the “Tombstones” (Cheese):
- Sharp cheddar cheese, cut into thick rectangular slices (acts as the base for tombstones)
- Mozzarella cheese blocks, cut into smaller rectangles (for a lighter, milder option)
- Goat cheese logs, sliced into rounds (adds a creamy, tangy contrast)
- Tip: Look for firm, small-curd cheddar for best structural integrity when standing up.
- For the “Dirt” (Crushed Snacks):
- Oreo cookies or chocolate sandwich cookies, crushed into fine crumbs (the classic “dirt”)
- Dark chocolate shavings (optional, for extra depth in the dirt)
- Substitution: Use gluten-free chocolate sandwich cookies if needed for dietary restrictions.
- For the “Bones” (Crackers & Pretzels):
- Pretzel sticks or pretzel rods, broken in half (perfect bone shapes)
- Bone-shaped crackers (available in many grocery stores during Halloween season)
- White cheddar crackers, cut into bone shapes using a cookie cutter (for a savory option)
- For the “Grass” and Garnish:
- Pistachios, chopped finely (provides a green, grass-like texture)
- Edible flowers or rosemary sprigs (for a touch of elegance and greenery)
- Ranch dressing or hummus in small cups (to serve as “puddles” or dipping sauces)
- For the “Coffins” and Extras:
- Salami or pepperoni, folded into coffin shapes (adds a meaty element)
- Green grapes (for a fruity, round element that looks like eyeballs or stones)
- Dark chocolate candies (like mini pumpkins or ghosts) for scattered details
I recommend sticking to firm cheeses that can stand on their own. Soft cheeses like brie are delicious but hard to shape into tombstones without making a mess. Also, do not skip the crushed Oreos. That “dirt” is what ties the whole visual theme together. It adds a sweet crunch that contrasts with the savory meats and cheeses. If you want to keep it savory, you can swap the Oreos for crushed pretzels or even seasoned breadcrumbs, but the chocolate adds that classic Halloween vibe that kids love.
Equipment Needed
You do not need much to pull this off. In fact, the less equipment you use, the better. Here is what you will need to assemble your Spooky Graveyard Halloween Charcuterie Board.
- Large Serving Platter or Board: A wooden board, slate, or even a large white platter works well. Dark wood or slate enhances the “graveyard” look, while white makes the colors pop. I prefer a rectangular board to give me more space for the “tombstones.”
- Cheese Knife or Sharp Knife: You will need a knife to cut the cheese into rectangles. A serrated knife works well for harder cheeses like cheddar.
- Small Bowls or Ramekins: These are essential for holding the “dirt” (crushed cookies) and any dips. Small white ramekins look like little coffins or urns.
- Ziplock Bags and Rolling Pin: To crush the Oreos. Put the cookies in a bag and crush them with a rolling pin, meat mallet, or even a heavy can. It is therapeutic and easy.
- Cookie Cutters (Optional): If you want to make bone-shaped crackers, a small bone-shaped cookie cutter is handy. You can also just use pretzel sticks.
If you do not have a fancy board, a clean, large baking sheet lined with parchment paper works perfectly. It is budget-friendly and easy to clean up. I have used everything from slate tiles to my grandmother’s old wooden cutting board for this. The key is to have a flat, stable surface. Avoid plates that are too small, as the theme relies on space and arrangement. You want room for the “tombstones” to stand tall.
Preparation Method
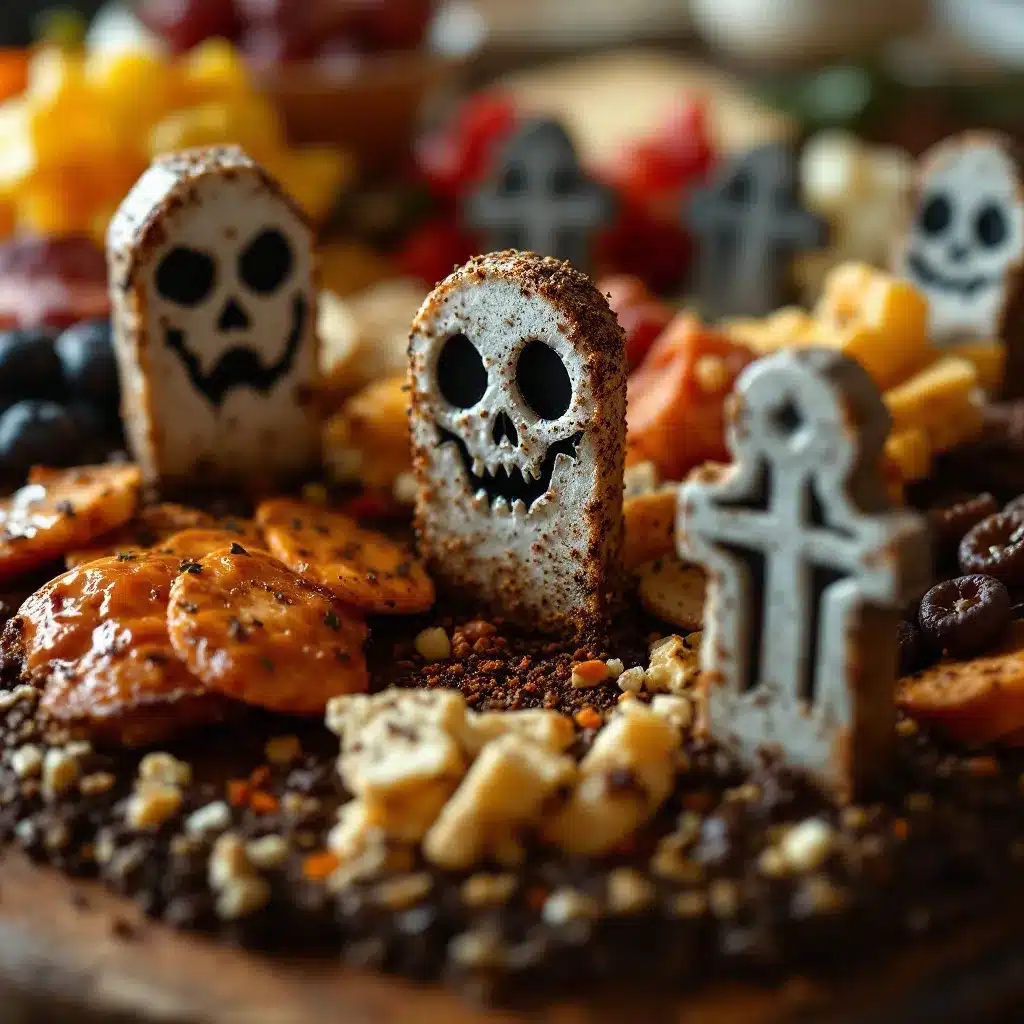
Creating this board is more like playing with food than cooking. Follow these steps to assemble your Spooky Graveyard Halloween Charcuterie Board with ease.
- Prepare the “Dirt” (5 minutes): Start by crushing your Oreos or chocolate sandwich cookies. Place them in a ziplock bag and crush them until they resemble fine soil. You want small crumbs, not large chunks. Set aside in a small bowl or ramekin. Tip: If you want a richer “dirt,” mix in a few chocolate shavings.
- Cut the Cheese “Tombstones” (10 minutes): Take your cheddar and mozzarella blocks. Cut them into thick, rectangular slices, about 1/2 inch thick. Aim for varying heights to make the graveyard look natural. Some tombstones should be taller, some shorter. Stand them up on your board. Warning: If the cheese is too soft, chill it in the fridge for 15 minutes before cutting to make it easier to handle.
- Arrange the Tombstones (5 minutes): Place your cheese rectangles on the board. Cluster them in groups of three or five to mimic a real cemetery. Leave space between them for the “dirt” and other snacks. Angle some of them slightly for a weathered, old look. Sensory Cue: You want the board to look like a scene, not a grid. Let the arrangement be organic.
- Add the “Bones” (5 minutes): Scatter pretzel sticks and bone-shaped crackers among the tombstones. Stick some pretzel sticks vertically into the “dirt” to look like they are sticking out of graves. Lay others flat around the cheese. Tip: Use white cheddar crackers for a savory bone option to balance the sweetness.
- Fill in the “Grass” and Details (5 minutes): Sprinkle chopped pistachios around the base of the tombstones to create patches of green grass. Add folded salami or pepperoni “coffins” in the empty spaces. Place small bowls of ranch or hummus as “puddles” near the graves. Sensory Cue: The board should look textured and inviting. The contrast of green pistachios against the dark “dirt” is visually striking.
- Final Touches (2 minutes): Add any extra candies, grapes, or chocolate ghosts. Step back and adjust. Ensure there is enough variety for different tastes. Personal Tip: I always add a few “spider web” crackers or pretzels for extra creepiness. It is the little details that make the board feel complete.
The entire process takes about 20-25 minutes. Do not overthink it. The goal is a rustic, spooky look, not perfection. If a “tombstone” falls over, just prop it up with a cracker. It adds to the charm.
Cooking Tips & Techniques
While this recipe requires no cooking, there are techniques to make it look professional. Here are some tips I have learned from trial and error.
- Texture Contrast: Ensure you have a mix of crunchy (pretzels, crackers), creamy (cheese, dips), and chewy (meats, candies). This keeps the snack interesting. A board with only hard items feels dry; a board with only soft items feels messy.
- Color Balance: The theme is dark, but you do not want the board to look monochromatic. Use the green pistachios, white cheese, and red salami to add pops of color. This makes it more appealing to the eye.
- Height Variation: Use small bowls or stack crackers to create height. A flat board can look boring. Elevating the “dirt” bowls makes the tombstones look taller and more dramatic.
- Prep Ahead: You can crush the cookies and cut the cheese up to 4 hours in advance. Store the cheese in the fridge to keep it firm. Assemble the board just before serving to prevent the crackers from getting soggy.
- Avoid Sogginess: Do not add wet fruits like strawberries or melon, as they can make the crackers and “dirt” soggy. Stick to dry or firm items like grapes, apples (tossed in lemon juice), or dried fruits.
I once made the mistake of adding fresh berries too early, and by the time guests arrived, the “dirt” was a mushy mess. Lesson learned. Keep wet ingredients separate or add them last minute. Also, taste your cheese before cutting. If it is too strong, it might overpower the other flavors. Mild cheddar and mozzarella are safer bets for a mixed crowd.
Variations & Adaptations
This Spooky Graveyard Halloween Charcuterie Board is highly adaptable. Here are some variations to suit different diets and preferences.
- Vegan Option: Swap dairy cheese for vegan cheese blocks. Use dark chocolate Oreos (many are vegan) and ensure the pretzels are vegan (check for honey). Use hummus instead of ranch.
- Gluten-Free Option: Use gluten-free crackers and pretzels. Ensure the Oreos are certified gluten-free. Most cheeses and meats are naturally gluten-free, so this is an easy swap.
- Keto/Low-Carb Option: Skip the cookies and crackers. Use cucumber slices as “bones” and cheese cubes as “tombstones.” Use crushed pork rinds as “dirt” and add nuts and olives for texture.
- Savory-Only Option: Remove all sweets. Use crushed pretzels for “dirt,” bone-shaped crackers, and add pickles or olives for a briny crunch. This is great for adults who prefer savory snacks.
- Kid-Friendly Option: Add more candies and chocolate. Use cookie cutters to make fun shapes. Let the kids help crush the cookies—it is a great activity.
I personally love the savory-only version for dinner parties. It feels more substantial and less like dessert. You can add ham and cream cheese pinwheels cut into small squares for a savory twist. The flexibility of this board is its greatest strength. You can tailor it to your guests’ needs without extra effort.
Serving & Storage Suggestions
Serve this board at room temperature for the best flavor. Cheese tastes best when it is not cold from the fridge, so take it out 30 minutes before serving.
- Presentation: Place the board in the center of the table. Use dim lighting or fairy lights to enhance the spooky atmosphere. It looks great on a dark tablecloth.
- Complementary Dishes: Pair with cheddar ranch popcorn for a crunchy side. A cold beverage like apple cider or dark soda works well.
- Storage: This board is best served fresh. If you have leftovers, store the cheese and meats in airtight containers in the fridge for up to 3 days. Do not store the assembled board, as the crackers will lose their crunch and the “dirt” will get messy.
- Reheating: No reheating needed. This is a cold snack. Simply refresh the board with new crackers and cheese if you are serving it again later.
- Flavor Development: The flavors do not change much over time, but the textures might. The “dirt” might absorb moisture from the air, so it is best to keep it covered if not serving immediately.
I usually make this board right before guests arrive. It takes so little time that there is no need to prep ahead. It is a meal in itself, so it can be the main snack or a side to a larger Halloween feast.
Nutritional Information & Benefits
This board is a mix of macronutrients. Cheese provides protein and calcium. Meats offer protein and iron. Crackers and cookies provide carbohydrates for energy. Nuts and seeds add healthy fats and fiber.
- Protein: High from cheese and meats, keeping you full longer.
- Fats: Healthy fats from nuts and cheese, aiding in nutrient absorption.
- Carbs: Moderate from crackers and cookies, providing quick energy.
- Allergens: Contains dairy, gluten, and nuts (depending on ingredients). Always check labels for specific allergies.
I view this as a balanced snack option. It is not a health food, but it is better than just eating candy. The combination of savory and sweet satisfies cravings without overdoing it. It is a mindful way to enjoy Halloween treats.
Conclusion
This Spooky Graveyard Halloween Charcuterie Board is a win-win. It is easy, delicious, and visually stunning. I love it because it takes the stress out of Halloween hosting. You get to be creative without spending hours in the kitchen. It is a recipe that allows you to enjoy the holiday spirit while still relaxing.
I encourage you to customize it based on your preferences. Add your favorite cheeses, meats, and snacks. Make it your own. I always add a few personal touches, like a small plastic spider or two, for extra fun. It is these small details that make the board special.
Please share your creations! I would love to see how you style your graveyard. Tag me on social media or leave a comment below with your variations. Let’s inspire each other with our spooky snack ideas. Happy Halloween, and enjoy your creepy-crawly feast!
FAQs
Can I make this charcuterie board ahead of time?
You can prepare the components (crush cookies, cut cheese) up to 4 hours in advance. However, assemble the board just before serving to prevent crackers from getting soggy and cheese from drying out.
What kind of cheese is best for tombstones?
firm cheeses like sharp cheddar, mozzarella, or gouda work best. They hold their shape when sliced into rectangles and stand upright easily. Avoid soft cheeses like brie or goat cheese logs unless you are using them for other elements.
How do I keep the “dirt” from getting messy?
Use small bowls or ramekins for the crushed cookies. This contains the “dirt” and prevents it from spreading across the board. You can also use a spoon to serve the dirt if you want guests to scoop it themselves.
Can I make this board gluten-free?
Yes! Use gluten-free crackers, pretzels, and cookies. Most cheeses and meats are naturally gluten-free, so just check the labels on processed snacks to ensure they are safe.
What drinks pair well with this board?
Cold apple cider, dark soda, or a crisp white wine like Sauvignon Blanc pairs well. For a spooky touch, serve drinks in black cups or add dry ice for a fog effect (use caution with dry ice).
Pin This Recipe!
Spooky Graveyard Halloween Charcuterie Board: Easy 5-Ingredient Idea
A stress-free, visually stunning Halloween snack board featuring cheese ‘tombstones,’ pretzel ‘bones,’ and crushed cookie ‘dirt.’ This no-cook recipe comes together in under 20 minutes and is perfect for parties or trick-or-treat drop-offs.
- Prep Time: 20 minutes
- Cook Time: 0 minutes
- Total Time: 20 minutes
- Yield: 1 large board (serves 8-10)
- Category: Appetizer
- Cuisine: American
Ingredients
- Sharp cheddar cheese, cut into thick rectangular slices
- Mozzarella cheese blocks, cut into smaller rectangles
- Goat cheese logs, sliced into rounds
- Oreo cookies or chocolate sandwich cookies, crushed into fine crumbs
- Dark chocolate shavings (optional)
- Pretzel sticks or pretzel rods, broken in half
- Bone-shaped crackers
- White cheddar crackers, cut into bone shapes (optional)
- Pistachios, chopped finely
- Edible flowers or rosemary sprigs
- Ranch dressing or hummus in small cups
- Salami or pepperoni, folded into coffin shapes
- Green grapes
- Dark chocolate candies (mini pumpkins or ghosts)
Instructions
- Crush Oreo or chocolate sandwich cookies in a ziplock bag until they resemble fine soil. Set aside in a small bowl or ramekin.
- Cut cheddar and mozzarella blocks into thick, rectangular slices (about 1/2 inch thick) of varying heights to mimic tombstones.
- Stand the cheese rectangles on the serving board, clustering them in groups of three or five. Angle some slightly for a weathered look.
- Scatter pretzel sticks and bone-shaped crackers among the tombstones. Stick some pretzel sticks vertically into the ‘dirt’ bowls to look like they are sticking out of graves.
- Sprinkle chopped pistachios around the base of the tombstones to create patches of green grass.
- Add folded salami or pepperoni ‘coffins’ in empty spaces and place small bowls of ranch or hummus as ‘puddles’ near the graves.
- Add final touches like grapes, chocolate candies, or spider web crackers. Adjust arrangement for visual appeal.
Notes
Use firm cheeses like sharp cheddar or mozzarella for best structural integrity. Avoid soft cheeses like brie for the tombstones. Keep wet ingredients like fresh berries separate to prevent sogginess. Serve at room temperature for best flavor. Can be made gluten-free by using GF crackers and cookies.
Nutrition
- Serving Size: Varied assortment of
- Calories: 350
- Sugar: 12
- Sodium: 450
- Fat: 22
- Saturated Fat: 10
- Carbohydrates: 25
- Fiber: 2
- Protein: 12
Keywords: Halloween, charcuterie board, easy party food, no bake, spooky snacks, graveyard theme, kid-friendly, gluten-free option


