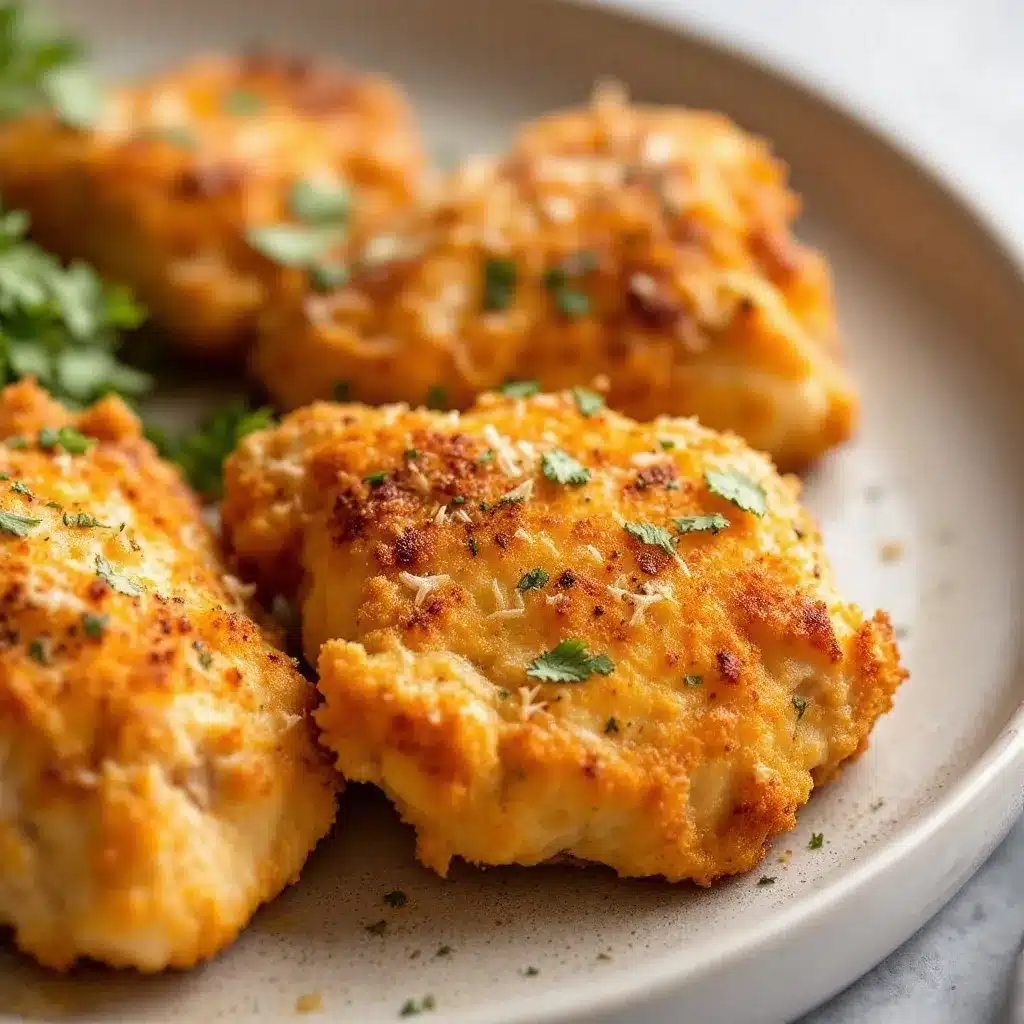
My husband actually asked me for these crispy air fryer chicken thighs with garlic Parmesan four nights in a row without me even bringing them up. Not in a nagging way—he’d just wander into the kitchen around five o’clock and say, “Are we having those chicken thighs tonight?” The first time I made them, I honestly wasn’t expecting much. I mean, chicken thighs in an air fryer sounded good on paper, but I figured they’d be decent at best. What I got instead was this ridiculous, shatter-crisp skin with juicy, fall-apart meat underneath, all coated in this nutty, savory garlic Parmesan situation that made us both forget we had side dishes planned.
This recipe happened by accident, honestly. I had a pack of bone-in, skin-on chicken thighs sitting in the fridge and a brand-new air fryer I was still figuring out. I wanted something simple but not boring, and I had this leftover Parmesan rind I needed to use up. So I grated it, mixed it with some garlic powder and a few pantry staples, and figured I’d toss it on the chicken and see what happened. The smell that filled my kitchen was ridiculous—like a garlic bread and roasted chicken hybrid that made my neighbor text me asking what I was cooking.
What I love about this recipe is that it looks impressive but takes almost no effort. You don’t need to brine, marinate, or babysit anything. The air fryer does all the heavy lifting, and the garlic Parmesan coating creates this golden crust that feels like you spent hours on it. It’s the kind of meal that makes you feel like a genius even when you barely tried.
Why You’ll Love This Recipe
Let me tell you why these crispy air fryer chicken thighs with garlic Parmesan have earned a permanent spot in my weekly rotation. I’ve tested this recipe at least eight times now, tweaking the temperature, the coating thickness, and the seasoning ratios until it was absolutely foolproof. And honestly? It’s the easiest way to get restaurant-quality crispy chicken without standing over a hot skillet or dealing with a greasy oven.
- Quick & Easy: From fridge to plate in under 30 minutes. No marinating, no flipping halfway through complicated steps. Just season, air fry, and eat.
- Simple Ingredients: You probably have everything in your pantry right now. Chicken thighs, Parmesan, garlic powder, salt, pepper, and a little oil. That’s it.
- Perfect for Busy Weeknights: This is my go-to when I need dinner on the table fast but still want something that feels special. It works for a quick family meal or a casual dinner with friends.
- Crowd-Pleaser: I’ve served these to picky eaters, health-conscious friends, and serious meat lovers. Every single person has asked for the recipe. The crispy skin and savory coating are universally loved.
- Unbelievably Delicious: The texture is what gets everyone. The skin turns shatteringly crisp, almost like fried chicken, but the meat stays tender and juicy. And that garlic Parmesan flavor? It’s nutty, salty, and absolutely addictive.
What makes this recipe different from all the other air fryer chicken recipes out there is the technique. Instead of just seasoning the skin, I pat the thighs completely dry, then coat them in a mixture of finely grated Parmesan and seasonings. The cheese melts into the skin as it cooks, creating this incredible crust that locks in moisture and adds a ton of flavor. It’s not just another version of air fryer chicken—it’s the best version I’ve ever tried.
This is the kind of recipe that makes you close your eyes after the first bite. It’s comfort food reimagined—healthier than fried chicken, faster than roasted chicken, and more flavorful than both. Perfect for impressing guests without any stress, or turning a simple Tuesday night into something memorable.
What Ingredients You Will Need
This recipe uses simple, wholesome ingredients to deliver bold flavor and satisfying texture without any fuss. Most of these are pantry staples, which makes this dish perfect for last-minute dinners.
- Bone-in, skin-on chicken thighs (4-6 thighs, about 2 pounds total) – This cut is key for juicy meat and crispy skin. Boneless thighs work too, but they cook faster and won’t get quite as crispy. Look for thighs with the skin still attached and intact.
- Freshly grated Parmesan cheese (½ cup, finely grated) – Please don’t use the pre-shredded stuff from a bag. It contains anti-caking agents that won’t melt properly. Grate it yourself from a block of Parmigiano-Reggiano for the best flavor and texture. I recommend using a microplane for the finest grate.
- Garlic powder (1 tablespoon) – Not garlic salt. Garlic powder gives you that pure garlic flavor without extra sodium. If you only have granulated garlic, use the same amount.
- Onion powder (1 teaspoon) – Adds a subtle sweetness that balances the savory notes. Optional but recommended.
- Paprika (1 teaspoon) – I use sweet paprika for color and mild warmth. Smoked paprika works beautifully too if you want a deeper, smokier flavor.
- Dried oregano (½ teaspoon) – Adds an herby, slightly peppery note that complements the garlic and Parmesan. You can substitute dried thyme or Italian seasoning.
- Salt (1 teaspoon, or to taste) – I use fine sea salt. Adjust based on how salty your Parmesan is.
- Black pepper (½ teaspoon, freshly ground) – Freshly ground makes a difference here. Pre-ground pepper tends to be less aromatic.
- Olive oil (1 tablespoon) – Helps the seasoning stick and promotes browning. Avocado oil works too, with a higher smoke point.
- Fresh parsley (2 tablespoons, chopped) – For garnish. Adds a pop of color and freshness that cuts through the richness. Optional but highly recommended.
- Lemon wedges (for serving) – A squeeze of lemon juice right before eating brightens up all the flavors. Don’t skip this—it makes a huge difference.
Ingredient Selection Tips: For the best results, look for chicken thighs that are roughly the same size so they cook evenly. If your thighs are on the larger side, you may need to add a minute or two to the cooking time. For the Parmesan, I recommend buying a small block of Parmigiano-Reggiano from the deli section. It’s more affordable than you think, and the flavor difference is night and day.
Substitution Guidance: If you’re dairy-free, you can use nutritional yeast (about ¼ cup) mixed with a little almond flour to mimic the texture of Parmesan. The flavor won’t be exactly the same, but it’s still delicious. For a gluten-free option, this recipe is naturally gluten-free as written. Just double-check your paprika and garlic powder labels if you’re sensitive.
Equipment Needed
You don’t need much for this recipe, which is part of the beauty. Here’s what you’ll need:
- Air fryer (6-quart or larger recommended) – I use a Cosori 5.8-quart model, and it works perfectly for 4-6 thighs. If yours is smaller, cook in batches to avoid overcrowding. Overcrowding is the number one reason air fryer food doesn’t get crispy.
- Paper towels – For patting the chicken thighs completely dry. This step is non-negotiable for crispy skin.
- Mixing bowl – A medium bowl for combining the Parmesan and seasonings.
- Tongs – For handling the chicken without tearing the skin. Silicone-tipped tongs are gentle on the air fryer basket.
- Microplane or fine grater – For grating the Parmesan cheese. A box grater works too, but the microplane gives you that fine, powdery texture that sticks best.
- Meat thermometer – Not strictly necessary, but highly recommended if you’re new to cooking chicken. The internal temperature should reach 165°F (74°C) at the thickest part.
Budget-Friendly Options: If you don’t own an air fryer yet, you can achieve similar results using a convection oven set to 400°F (200°C). Place the chicken on a wire rack set inside a baking sheet to allow air circulation. The cooking time will be slightly longer—about 25-30 minutes. I’ve also made these in a regular oven at 425°F (218°C) with decent results, but the skin won’t be as crispy without the air circulation.
Preparation Method
Let me walk you through this step by step. Trust me, it’s easier than it sounds, and the results are absolutely worth it.
- Preheat your air fryer to 400°F (200°C). Most air fryers need about 3-5 minutes to preheat. While it’s heating, you can prep the chicken. I usually set a timer so I don’t forget.
- Pat the chicken thighs completely dry. Take your paper towels and press firmly on both sides of each thigh. You want the skin to be as dry as possible—any moisture will steam the skin instead of crisping it. I usually use about 4-5 paper towels for 6 thighs. Don’t be shy here.
- Mix the coating. In a medium bowl, combine the grated Parmesan, garlic powder, onion powder, paprika, dried oregano, salt, and black pepper. Use a fork to mix everything together until the Parmesan is evenly distributed. The mixture should look like a coarse, crumbly powder.
- Season the chicken. Drizzle the olive oil over the chicken thighs and use your hands to rub it evenly over all sides. Then, one by one, press each thigh into the Parmesan mixture, coating all sides generously. Don’t forget the underside—it adds flavor even if it doesn’t get as crispy. Gently pat the coating so it sticks well.
- Arrange in the air fryer basket. Place the chicken thighs skin-side up in a single layer. Make sure they’re not touching each other. If they’re overlapping, the skin won’t crisp properly. Depending on your air fryer size, you might need to cook in two batches. It’s better to do two batches than to overcrowd.
- Air fry at 400°F (200°C) for 20-22 minutes. Do not flip the chicken halfway through. The skin needs to stay in contact with the hot air to get crispy. If you flip it, the coating might fall off. I set my timer for 18 minutes, then check for doneness.
- Check internal temperature. Insert a meat thermometer into the thickest part of a thigh, avoiding the bone. It should read 165°F (74°C). If it’s not quite there, cook for another 2-3 minutes and check again. Every air fryer runs a little differently.
- Rest before serving. Let the chicken thighs rest in the air fryer basket (turned off) for 2-3 minutes. This allows the juices to redistribute and the skin to stay crispy. If you cut into them immediately, the juices will run out and the skin might soften.
- Garnish and serve. Transfer the chicken to a serving platter, sprinkle with fresh chopped parsley, and serve with lemon wedges on the side. A squeeze of lemon right before eating brightens everything up beautifully.
Visual and Sensory Cues: The skin should be deep golden brown and look slightly crackled. You’ll hear a faint sizzling sound as the fat renders. The coating should feel firm to the touch, not greasy. When you insert a thermometer, it should slide in easily with no resistance. The smell will be intoxicating—garlicky, nutty, and savory.
Troubleshooting Tip: If your skin isn’t crispy after 20 minutes, don’t panic. Check if your air fryer is preheated properly. Some models run cooler than others. You can also increase the temperature to 425°F (218°C) for the last 2-3 minutes, but watch closely so the Parmesan doesn’t burn. If the coating looks too dark but the chicken isn’t done, tent loosely with foil and continue cooking.
Cooking Tips & Techniques
After making these crispy air fryer chicken thighs with garlic Parmesan more times than I can count, I’ve learned a few things the hard way. Let me save you some trouble.
The Drying Step is Everything: I cannot stress this enough. Wet skin = soggy skin. I once rushed through this step because I was hungry, and the skin came out chewy and pale. Take the extra 30 seconds to really dry each thigh thoroughly. If you have time, leave the chicken uncovered in the fridge for an hour before cooking—this dries out the skin even more.
Don’t Skip the Oil: Some recipes skip the oil to make it healthier, but the oil is essential for two reasons. First, it helps the seasoning stick. Second, it promotes browning and crisping. You only need a tablespoon for 6 thighs, so it’s not a lot. Use your hands to rub it in evenly—it’s the most efficient method.
Grate Your Own Parmesan: I know it’s tempting to use the pre-grated stuff from a jar, but please don’t. It’s coated in anti-caking agents that prevent melting. Freshly grated Parmesan melts into the skin, creating that incredible crust. A microplane makes this job fast and easy. I grate about ½ cup for 6 thighs.
Temperature Matters: 400°F is the sweet spot for bone-in, skin-on chicken thighs. Too low, and the skin won’t crisp before the meat overcooks. Too high, and the Parmesan coating might burn before the chicken is done. If your air fryer runs hot, start checking at 18 minutes.
Batch Cooking Strategy: If you’re cooking for a crowd, keep the first batch warm in a 200°F (93°C) oven while you cook the second batch. Place them on a wire rack set inside a baking sheet so the skin stays crispy. Don’t cover them with foil—that traps steam and ruins the texture.
My Biggest Failure: The first time I made these, I used too much coating and it fell off in big clumps during cooking. I learned that a thin, even layer is better than a thick one. The Parmesan melts and adheres to the skin, but if you pile it on, it just slides off. Less is more here.
Variations & Adaptations
One of the best things about this recipe is how easy it is to customize. Here are some variations I’ve tried and loved.
Spicy Buffalo Version: Add 1 teaspoon of cayenne pepper and ½ teaspoon of smoked paprika to the coating. After cooking, toss the hot chicken thighs in a mixture of 2 tablespoons melted butter and 2 tablespoons hot sauce (Frank’s RedHot is my go-to). Serve with ranch or blue cheese dressing. This version is perfect for game day, and it pairs beautifully with this creamy buffalo chicken dip if you’re hosting a party.
Lemon Herb Version: Replace the garlic powder with 1 tablespoon of lemon zest and add 1 teaspoon of dried thyme and 1 teaspoon of dried rosemary to the coating. Finish with a squeeze of fresh lemon juice before serving. This version is lighter and brighter, perfect for spring or summer dinners.
Keto/Low-Carb Version: This recipe is already naturally low-carb, but you can boost the fat content for keto by adding 2 tablespoons of almond flour to the coating mixture. The almond flour helps create an even crispier crust. Serve with roasted vegetables or a big green salad.
Air Fryer vs. Oven: If you don’t have an air fryer, preheat your oven to 425°F (218°C). Place the chicken on a wire rack set inside a baking sheet. Bake for 25-30 minutes, or until the internal temperature reaches 165°F (74°C). The skin won’t be quite as crispy, but it’s still delicious. For extra crispiness, broil for the last 2-3 minutes, watching carefully.
Personal Variation: I once added a tablespoon of nutritional yeast to the coating for an extra cheesy, umami flavor. It was surprisingly good—nutty and savory without being overpowering. My husband didn’t even notice the difference until I told him.
Serving & Storage Suggestions
These crispy air fryer chicken thighs with garlic Parmesan are incredibly versatile when it comes to serving. Here’s how I like to enjoy them.
Serving Temperature: Serve hot, straight from the air fryer. The skin is at its crispiest within the first 10 minutes. If you need to hold them, keep them in a warm oven (200°F) on a wire rack for up to 30 minutes. Avoid covering them.
Presentation Tips: Arrange the chicken thighs on a large platter, skin-side up. Sprinkle with fresh parsley and serve with lemon wedges on the side. I love adding a small bowl of extra grated Parmesan for people who want more. The bright green parsley against the golden brown chicken looks gorgeous on the table.
Complementary Dishes: These chicken thighs go beautifully with almost any side dish. I love serving them with a simple arugula salad dressed with lemon vinaigrette, roasted asparagus, or garlic mashed potatoes. For a lighter meal, try them alongside this fresh quinoa avocado sushi salad bowl for a complete and satisfying dinner. The flavors complement each other perfectly.
Storage Instructions: Store leftover chicken thighs in an airtight container in the refrigerator for up to 4 days. The skin will soften, but the flavor remains delicious. I like to remove the skin before storing and reheat it separately to maintain crispiness.
Reheating Methods: The best way to reheat is in the air fryer at 375°F (190°C) for 3-4 minutes. This helps restore some of the crispiness. You can also reheat in a 350°F (175°C) oven for 10 minutes. Avoid the microwave—it will make the skin rubbery and the meat dry.
Freezer Instructions: These chicken thighs freeze beautifully. Let them cool completely, then wrap each thigh individually in plastic wrap and place in a freezer-safe bag. They’ll keep for up to 3 months. To reheat, thaw overnight in the refrigerator, then air fry at 375°F (190°C) for 5-6 minutes.
Flavor Development: Interestingly, the flavors actually meld and deepen after a day in the fridge. The garlic and Parmesan become more pronounced. I sometimes make a double batch just so I can have leftovers for lunch the next day. They’re amazing cold, sliced over a salad.
Nutritional Information & Benefits
Here’s the estimated nutritional breakdown for one serving (one chicken thigh, based on 6 servings):
| Nutrient | Amount per Serving |
|---|---|
| Calories | 285 |
| Protein | 28g |
| Fat | 18g |
| Saturated Fat | 5g |
| Carbohydrates | 2g |
| Fiber | 0g |
| Sugar | 0g |
| Sodium | 520mg |
| Calcium | 120mg |
Health Benefits: Chicken thighs are an excellent source of high-quality protein, which supports muscle growth and repair. They’re also rich in B vitamins, particularly B6 and B12, which are essential for energy metabolism. The Parmesan cheese adds calcium for bone health and a small amount of protein. Unlike fried chicken, this air fryer version uses minimal oil, making it a healthier alternative without sacrificing flavor.
Dietary Considerations: This recipe is naturally gluten-free, low-carb, and keto-friendly. It’s also suitable for those following a paleo diet if you omit the Parmesan or use a dairy-free alternative. For dairy-free, try the nutritional yeast version mentioned in the variations section. The recipe contains dairy (Parmesan) and is not suitable for vegans.
Potential Allergens: This recipe contains dairy (Parmesan cheese). If you have a dairy allergy, substitute with nutritional yeast or a dairy-free Parmesan alternative. Always check your spice labels for cross-contamination if you have severe allergies.
My Wellness Perspective: I love that this recipe lets me enjoy crispy, flavorful chicken without the guilt of deep frying. It’s a perfect example of how you can eat well without sacrificing taste. The air fryer makes it easy to prepare a nutritious meal that feels indulgent.
Conclusion
These crispy air fryer chicken thighs with garlic Parmesan have become a staple in my kitchen for good reason. They’re quick, simple, and deliver incredible flavor and texture with minimal effort. Whether you’re cooking for a busy weeknight dinner, a casual gathering with friends, or just treating yourself to something special, this recipe never disappoints.
I love how customizable this recipe is—you can make it spicy, herby, or keep it classic. It’s the kind of dish that feels like a secret weapon in your cooking arsenal. Once you try it, you’ll understand why my husband asked for it four nights in a row. It’s that good.
I’d love to hear how yours turn out! Drop a comment below and let me know if you tried any variations or if this recipe became a hit in your household like it did in mine. Don’t forget to share your photos on Pinterest and tag me—I love seeing your creations. Happy cooking, friends!
Frequently Asked Questions
Can I use boneless, skinless chicken thighs for this recipe?
Yes, you can, but the results will be different. Boneless, skinless thighs cook faster (about 12-15 minutes at 400°F) and won’t have that crispy skin we love. The coating will still add great flavor, but the texture won’t be the same. If you use boneless thighs, reduce the cooking time and check for doneness early.
Why is my chicken skin not crispy in the air fryer?
The most common reason is moisture. If the skin isn’t patted completely dry before seasoning, it will steam instead of crisp. Another culprit is overcrowding the basket. Make sure the thighs are in a single layer with space between them. Finally, check that your air fryer is fully preheated before adding the chicken.
Can I make this recipe ahead of time for meal prep?
Absolutely! These chicken thighs are great for meal prep. Cook them as directed, let them cool completely, and store in an airtight container in the refrigerator for up to 4 days. When you’re ready to eat, reheat in the air fryer at 375°F for 3-4 minutes to restore crispiness. They’re also delicious cold, sliced over salads.
How do I prevent the Parmesan coating from burning?
Parmesan can burn if cooked at too high a temperature or for too long. Stick to 400°F and check the chicken at 18 minutes. If the coating looks like it’s browning too quickly, you can reduce the temperature to 375°F and add a few extra minutes. Also, make sure the Parmesan is finely grated—larger pieces are more likely to burn.
Can I use chicken breasts instead of thighs?
Yes, but keep in mind that chicken breasts are leaner and can dry out more easily. Use boneless, skinless chicken breasts and adjust the cooking time to 15-18 minutes at 400°F. Check the internal temperature at 15 minutes. The coating will still be delicious, but the skinless version won’t have the same crispy texture as skin-on thighs. For best results, use bone-in, skin-on chicken breasts if you can find them.
Pin This Recipe!

Crispy Air Fryer Chicken Thighs with Garlic Parmesan

These crispy air fryer chicken thighs with garlic Parmesan are quick, easy, and deliver incredible flavor and texture with minimal effort. The air fryer creates a shatter-crisp skin with juicy, fall-apart meat underneath, all coated in a nutty, savory garlic Parmesan crust.
- Prep Time: 10 minutes
- Cook Time: 22 minutes
- Total Time: 32 minutes
- Yield: 4-6 servings 1x
- Category: Main Course
- Cuisine: American
Ingredients
- 4–6 bone-in, skin-on chicken thighs (about 2 pounds total)
- ½ cup freshly grated Parmesan cheese (finely grated)
- 1 tablespoon garlic powder
- 1 teaspoon onion powder
- 1 teaspoon paprika (sweet or smoked)
- ½ teaspoon dried oregano
- 1 teaspoon fine sea salt (or to taste)
- ½ teaspoon freshly ground black pepper
- 1 tablespoon olive oil
- 2 tablespoons fresh parsley, chopped (for garnish)
- Lemon wedges (for serving)
Instructions
- Preheat your air fryer to 400°F (200°C).
- Pat the chicken thighs completely dry with paper towels.
- In a medium bowl, combine the grated Parmesan, garlic powder, onion powder, paprika, dried oregano, salt, and black pepper. Mix until evenly distributed.
- Drizzle the olive oil over the chicken thighs and rub it evenly over all sides. Press each thigh into the Parmesan mixture, coating all sides generously.
- Arrange the chicken thighs skin-side up in a single layer in the air fryer basket, making sure they are not touching. Cook in batches if necessary.
- Air fry at 400°F (200°C) for 20-22 minutes. Do not flip halfway through.
- Check the internal temperature with a meat thermometer; it should reach 165°F (74°C) at the thickest part. If not, cook for another 2-3 minutes.
- Let the chicken thighs rest in the air fryer basket (turned off) for 2-3 minutes.
- Transfer to a serving platter, sprinkle with fresh parsley, and serve with lemon wedges.
Notes
Pat the chicken thighs completely dry for crispy skin. Do not flip the chicken during cooking. Use freshly grated Parmesan for best results. If the coating browns too quickly, reduce temperature to 375°F and add a few extra minutes. For meal prep, store in an airtight container in the refrigerator for up to 4 days; reheat in the air fryer at 375°F for 3-4 minutes.
Nutrition
- Serving Size: 1 chicken thigh
- Calories: 285
- Sodium: 520
- Fat: 18
- Saturated Fat: 5
- Carbohydrates: 2
- Protein: 28
Keywords: air fryer chicken thighs, crispy chicken thighs, garlic parmesan chicken, air fryer recipe, easy chicken dinner, weeknight dinner, keto chicken, low carb chicken


